This guide will get you up and running no time flat.
Register the Evonode
Things you will need.
Setup the server
Currently, DashMate is the only way to setup an Evonode.
Login to your VPS as 'root' and issue....
Note, the version above is current as of now, but it will change, to find the link to the latest version of DashMate, use this link https://github.com/dashpay/platform/releases then right click on the package for your OS and copy that link and replace it in the above. Once DashMate is running, select the below options.
Then select the following options.
> mainnet
> evolution masterndoe
> yes (to not meeting system reqs)
> yes (to masternode registered, you do this step before even starting this)
> no (to import existing data)
> BLS key (enter the secret/private BLS key you already generated when creating the MN)
> Ed25519 node key (poorly named, this is asking for the private key of the Tenderdash node key, enter it here)
> External IP address (enter the IP address of this VPS, same one you registered the masternode with)
> ZeroSSL (choose this)
> ZeroSSL api key (enter it from your ZeroSSL account, yes you need to register with them)
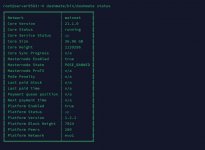
To start and verify the Evonode is running, use the below commands.
Reinstall/Upgrade Evonode
The process to reinstall or upgrade the evonode is to,
Register the Evonode
Things you will need.
- 4000 Dash in a single UTXO.
- VPS with about 4 cores, 8GB RAM and at least 100GB of SSD storage.
- A ZeroSSL account and API key (click on the developer section on the site)
Setup the server
Currently, DashMate is the only way to setup an Evonode.
Login to your VPS as 'root' and issue....
Code:
curl -fsSL https://get.docker.com -o get-docker.sh && sh ./get-docker.sh
wget https://github.com/dashpay/platform/releases/download/v1.5.0/dashmate-v1.5.0-8aa624e3e-linux-x64.tar.gz
tar xvf dashmate-v1.5.0-8aa624e3e-linux-x64.tar.gz
dashmate/bin/dashmate setup
Note, the version above is current as of now, but it will change, to find the link to the latest version of DashMate, use this link https://github.com/dashpay/platform/releases then right click on the package for your OS and copy that link and replace it in the above. Once DashMate is running, select the below options.
Then select the following options.
> mainnet
> evolution masterndoe
> yes (to not meeting system reqs)
> yes (to masternode registered, you do this step before even starting this)
> no (to import existing data)
> BLS key (enter the secret/private BLS key you already generated when creating the MN)
> Ed25519 node key (poorly named, this is asking for the private key of the Tenderdash node key, enter it here)
> External IP address (enter the IP address of this VPS, same one you registered the masternode with)
> ZeroSSL (choose this)
> ZeroSSL api key (enter it from your ZeroSSL account, yes you need to register with them)
To start and verify the Evonode is running, use the below commands.
Code:
dashmate/bin/dashmate start
dashmate/bin/dashmate status
docker ps
Reinstall/Upgrade Evonode
The process to reinstall or upgrade the evonode is to,
- Wipe the VPS and reinstall Ubuntu.
- Download the new DashMate and try to upgrade via it.
Last edited:

